A food world devoted to the young chef and those young at heart

Saturday, August 28, 2010

Arugala Salad

A delicately wonderful salad to pair with fish, chicken or beef or double the recipe for a main dish. I am posting this to go along with the hamburger post I wrote about earlier.

Arugula Salad
pre heat oven to 400 degrees Fahrenheit
Serves 3 side servings

  • 1/2 lb potatoes (Yukon gold, Red, Idaho, most any variety should work)
  • Less than a tbsp Olive Oil
  • 1 tsp red pepper flakes (or to taste)
  • Salt and Pepper
  • 3 cups Arugula
  • 5 cups Spring Mix
  • Dijon Mustard dressing
Cut away the ugly parts of the potato and slice into 1/4 - 1/2 inch discs. Line a cookie sheet with foil and toss the potatoes with the olive oil, red pepper flakes, salt and pepper. Lay out the potatoes across the cookie sheet and bake in the oven for 30 minutes, or until one side is golden brown. Once they have reached their caramelized perfection flip them over and allow them to bake another 10 minutes.
Place a bed of spring mix on each plate, top with arugula and some potatoes, drizzle desired dressing and serve.

The bitter peppery arugula plays well with the spicy warm mustard and potatoes, leaving a very interesting balance of flavors.

The Timeless Famous Hamburger

School has officially begun, yet our household is refusing to let go. In one of our last testaments to the jovial season my dad demanded to grill. My mom and I did not refuse him, we had fresh tomato and onion smiling at us from the table wanting to be used. Pure and straightforward is the way to go: salt, pepper and ground beef. Let the smoke of the grill speak for itself and vegetables will only encourage this phenomenon.

The hamburger has become one of the icons of American culture. Endless TV shows, books, magazines and restaurants have devoted themselves to ground beef and its condiments. The United States holds that our ancestors were the fist to combine steak with bread, yet the two have been around for a majority of human history and surely someone had munched on a hamburger in their cave or farmhouse. I found that ground meat originated with the warrior Mongols who would place filets of meat under their saddles as they rode allowing it to crumble and cook. Not very yummy sounding but I guess if you are a macho solider it was a grand meal and the ultimate of fast food. They then dropped this culinary tip in the Russian culture who developed steak tar tare. The port city of Hamburg was introduced to minced meat by the Russians and these German immigrants brought it to the States.
Okay so now we understand the history of the meat but what about the bread? Well the official sandwich wasn't developed until the 1765 when the Earl of Sandwich requested a snack he could eat without getting his fingers dirty as he played cards. In 1904, at the St. Louis Fair, two different men are attributed to selling hamburgers, but there is also accounts that two men from Hamburg, New York were at the Erie County Fair in 1892 and ran out of sausages and instead put ground beef on the bread. An yet another tale of a young teen, Charles Nagreen, made sandwiches with meatballs and sold them at the Seymour fair in 1885, so people could snack as they walked. Numerous tales attribute the founding of the hamburger to a variety of different businesses and people but all in all, we have the sandwich, we enjoy the sandwich, we eat the sandwich.


From A Teen Foodie


Here are a few tips on the "perfect burger", allowing a clean palette for you to paint -urrr-cook upon.
  • To keep it healthy we use 93% lean ground beef
  • A good portion size is about 4oz
  • Insuring a flat patty as the end result, intend the middle
  • Don't press on the beef while cooking, you will dry it out
  • When the burgers are finishing add cheese and the bun so they are both nice and warm

Sunday, August 22, 2010

Test Cook #1

As a result of my "library funtime", I had an intense list of new recipes to try. This has lead me to a new series, Test Cook. Every once in a while, along with our own home developed recipes, I will post my adventures with others' food concoctions. From cookbooks, to TV shows, Internet creativity to magazines, no one is safe! I shall be testing (and taking requests if people want me to test a recipe and it appeals to me I may try it out).

But the first order of business was The Flexitarian Table by Peter Berley (The Flexitarian Table: Inspired, Flexible Meals for Vegetarians, Meat Lovers, and Everyone inBetween). I kinda fell in love with this book yet this admiration must first be proven and confirmed that it had the caliber to be a part of my Christmas list.
The recipe I first tried was Grilled Shrimp in Harissa with Fresh Corn Polenta and Cherry Tomatoes (pg 113-115 in the book). I wrote a list for the few items we had yet to acquire, the most important of which was polenta meal. I waited until Saturday (the day of the farmer's market) when my parents would follow me on an escapade to capture any and all ingredients we saw fit to accumulate (put simply: we went grocery shopping).
 After a long day's massive quest for ingredients and produce whilst visiting Lawrence and the farmer's market there, we were still lift polenta-less. We went to Walmart, the Mercantile, Aldi's, another Walmart, and not until this morning did we manage to find the infamous medium ground grits aka polenta. This scouring had put me in an unpleasant mood, my enthusiasm the recipe was almost lost but once we unearthed it, the gorgeous wonderful phenomenal staggering corn meal - okay, I may be exaggerating quite a bit about its beauty, but after such the search and finally discovering it, I was once again keen to cook.

It turned out lovely, only a few changes to the original due to our family taste and the fact that cooking is an art, and whatever happens in the heat of the moment happens. My dad (the grill master, as most fathers are) grilled the shrimp and delivered them to the table with much pride. The Harissa (the marinade for the shrimp) was scrumptious, and according to Peter Berley's book originates in northern Africa. Its quick to concoct and tasted of warmth, of sun rays dripping over your tongue, of laying on the grass in mid-July heat...yummmm. And the polenta, oh my the polenta! It was magical, well worth all the toil and struggle to find. Its our home's new comfort food, balmy and smooth yet still retaining bite, the addition of fresh bits of corn brought out a whisper of sweetness while a dash of salt and butter complemented its corny elements. The only draw back was the tomatoes, they were by no means bad but unnecessary, they didn't add anything the dish needed and felt a tad akward with the other flavors.

In the end it was a grand undertaking, allowing my parents and I to savor the flavors even more.

Saturday, August 21, 2010

To market to market...

There are no words to characterize my adoration of farmer's markets. The bounty of vibrant colours, laughing and twittering people, scents of grass, herbs, bread, bouquets of flowers and freshly brewed coffee encompass every step one takes. I look forward to early rising and making the long quite drive down dusty gravel roads, past attentive dairy cows munching on dewy grass, and finally cramming into a munchkin sized parking spot. It takes discipline not to buy from every stand, or else the heaping bounty of goods purchased could not be consumed within a descent time. Once all is done a feeling of contentment consumes me on the drive back home.

Here are some pictures I took:

Monday, August 16, 2010

Summer Lasagna (Vegetarian)

Our garden is struggling a bit this summer (the heat swelters on) yet our household need not despair our eggplant is growing strong, the zucchini is blooming, the basil is as magical as ever and of course the farmer's market is thriving with wondrous treats. So to utilize all the colourful flavorful meaty vegetables my dad brought up vegetarian lasagna (yeah the big carnivore in the house wants vegetarian lasagna go figure). Well to say the least, it is one of the most satisfying dishes ever. An explosion of epic flavor integrating together, a trademark of all classic comfort food.


Summer Lasagna
Preheat oven to 375 degrees Fahrenheit
serves 3-4

  • 1 medium zucchini
  • 1 medium eggplant (any variety will do, we used Japanese eggplant)
  • 1 14.5 ounce can of unsalted diced tomatoes
  • 1 heaping 1/2 cup of Greek yogurt (mixed with some salt and pepper)
  • 6 lasagna noodles (the kind that cook in the oven)
  • 1/2 lb button mushrooms
  • 1 small hand full of basil
  • 1 small hand full of flat leaf parsley
  • 1/2 of an onion
  • 2 medium cloves of garlic
  • Handful of Mozzarella cheese
  • Salt and pepper
Begin by dicing the onion and garlic, rough chopping the basil and parsley, slicing the mushrooms, cutting the zucchini and eggplant into discs (approximately a quarter of an inch wide).
Dribble some olive oil into a saute pan and heat over medium-high heat. Once the oil is hot add the zucchini and eggplant in a single layer (I had to do it in two batches). Wait a few minutes, then flip them over they should reveal a golden carmelization on that cooked side. If you are getting to much sticking, deglaze the pan with a splash of water. Continue to saute until fully cooked (the white flesh with have degraded in colour). take out of the pan and set aside.

Add oil to the same pan, saute the onion and then add the garlic and mushrooms.Once brown and delicious pour in the tomatoes and herbs with a dash of salt and pepper. Turn off the heat and set aside.
Using a square glass baking dish, pour a laddle full of the tomato mushroom sauce on the bottom and place two lasagna noodles on top of that. On this dress with more sauce and a layer of eggplant/zucchini. Set two more noodles on this, spread the yogurt, followed by another layer of eggplant/zucchini. Put the final two noodles on top with the remaining sauce and sprinkle mozzarella cheese.
Now place in the oven for approximately 30 minutes or until the noodles are cooked (don't be freaked out if some of the noodles on the top are crispy, its just because they are near the edge) and the cheese is a golden paradise. Cut into fourths, serve and swim in the abundance of meaty textures, fragrant herbs and tantalizing-ly scrumptious vegetables.

Saturday, August 14, 2010

Meatless Reubans

My favorite thing about spring is St.Patrick's day, not because I like the colour green and leprechauns bother me but Rubens and more specifically sour kraut. So every year I wait until March and savor the two days we pig out on Rubens, but last year my mom and I stumbled upon a thought: why wait once a year for the corn beef to go on sale, why not try it without it? Oh my golly jeepers, they are my favorite thing, ooooohhh the way the tart sour kraut melts with the Swiss cheese and mixes with the sweet thousand island dressing all resting on two toasty delicious slices of pumpernickel bread...I'm in yummy heaven!

Meatless Reuben
Preheat oven to 375 degrees Fahrenheit
Makes enough for 8 sandwiches

  • Thousand Island Dressing (recipe below)
  • 16 slices Rye or Pumpernickel bread (or going fifty-fifty would be nifty...)
  • Sauerkraut (38 ounce jar)
  • 8 slices of Swiss cheese
  • Butter or olive oil
Spread some of the dressing on each slice of bread and top one slice with the desired amount of kraut (my sandwich is more like kraut with bread but you need not be that extreme). Place a slice of cheese on top and then the other piece of bread. Put a wee bit of butter on the top and bottom of the sandwich and toast in the oven on a cookie sheet for 12 minutes. Flip over and cook for 5 minutes more. Slice and melt in the amazing-ness of it all.


Thousand Island Dressing
  • 1/4 cup Mayo
  • 2 tbsp pickle relish
  • 1 tsp ketchup
  • 1 tsp mustard
  • Miniature splash of Worcestershire Sauce
Mix up the above ingredients.

Now the history of the Reuben is not a clean and easy to learn about as making them. There is some much confusion as to the true origins of the famous classic but if you are really interested this website has a lot of information http://www.rowlandweb.com/reuben/history.asp.
 

Wednesday, August 11, 2010

Library Funtime

Okay so I had a little too much fun on my local library's website and requested a rather obtuse amount of cookbooks...I couldn't help myself, its a sad addiction. Oh well what's done is done and I am now even more motivated to cook, bake, stew, saute, whatever strikes me! Be excited if you reading this, get ready for yummy overload and grumbling stomachs.

Sunday, August 8, 2010

Gourmet Egg Muffin

A light lunch or a satisfying breakfast, eggs and English muffins are a match made in heaven, they are soooo delicious. But no one wants to drag themselves from the comforts of their slippers and adjust their bed head just to travel to a fast food drive thru for a breakfast meal with a mediocre egg stuffed between two chewing English muffins, rather making them at home is way more joyful.

So the way I gaudy-ed this up was by using a melty over-easy egg, caramelized onion, farmer's market mushrooms, and crisp English muffins. The egg explodes in your mouth, releasing a flood of golden awesome-ness, combining with the sweet tang of onion and the rich meaty mushroom....oh the yumminess....

Gourmet Egg Muffin
Pre-Heat Oven to 375 degrees Fahrenheit
serves: 4 (or if you have a hungry Dad in the house, he gets 2)
  • 4 English muffins or 4 of those flat sandwich bun thingy-dubers
  • 4 slices of American cheese (optional, I personally don't have any)
  • 1 onion (purple, yellow, whatever you desire)
  • Mushrooms
  • 4 eggs
  • salt and pepper
Split the muffins with a fork and put in the oven for 15 minutes.
While those toast up slice the onion in half and then slice into thin half-rings. Chop the mushrooms and using a non-stick skillet, saute them up along with the onion with a wee bit of olive oil until they have reached a slightly golden colour. Remove from the skillet and set aside.

Wait until the muffins are done and then turn the oven to warm. Place the cheese on one half of the muffin along with some onion-mushroom mixture, leave this in the oven while you cook the eggs.

Now one could use sunny-side up eggs or poached eggs, I am better at cooking over-easy eggs so that's what I use (or if some accidents should arise while cooking turn them into scrambled). Turn the skillet to a medium heat with a little dribble of olive oil. Crack the eggs onto the skillet and season with salt and pepper. Once the whites are solid in colour use a spatula to gently slid/flip them over. Cook until the eggs are cooked (though I like mine a little runny). Turn off the heat.
Get out the muffins (the cheese should be melty) and place the egg on top. Take a bite and allow the magic of eggs consume you.

Tuesday, August 3, 2010

If anyone is reading...

A wise man once told me (oaky fine is was my dad) that I shouldn't waste all my recipes at once so I am going to go down to a post a week rather thatn one a day (yeah ona day was pusshing it, I can't help it I was excited). Maybe when people start to read the blog I will increase my post-age but until then my 3 loyal friends, one post a week :)

Monday, August 2, 2010

Ahhh the magic of the Sandwich

My parents and I did not get home for lunch until 3 o' clock. We were a wee bit grumpy due to our grumbly stomachs. In order for the tense atmosphere to evaporate a quick lunch was in order.

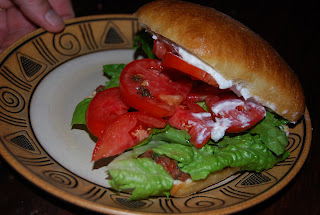
We toatsted chiabata bread spread on some Olive tapanade (see earlier post), lettuce and fresh tomato. My dad also spread thickly strained greek yogurt on his or (if you are my mom) feta cheese.

Point is it was sooooo yummy and tasted like it took hours to make :)

Olive Tapenade

Olive tapenade is an intensely flavorful spread. Made with capers or olives it originated in the Mediterranean. Olives and capers were brought to the Mediterranean from the island of Crete by Greek explorers. The name tapenade stems from Provence term tapeneï meaning caper. The recipe my mom showed me how to make uses Kalamata olives and I have included a recuipes using you capers if you so wish. Tapenade is wonderfully easy to make and stores in the fridge for over a month. It contains spectacular bursts of flavor and its a fun special touch for wraps and sandwiches.

Olive Tapenade:
(This filled a 16oz jar with a little extra besides)
  • approximately 2 (drained) cups of Kalamata olives
  • 1 big clove of garlic
  • 1/2 cup sun dried tomatoes
  • 2 tablespoons of pesto OR a handful of basil
Read the following directions very very VERY carefully: blend in a food processor until it reaches a paste like consistency...okay you didn't have to read that carefully...

Variation: You can make a Green Tapenade too. Instead of kalamata olives substitute 2 (drained) cups of Sicilian green olives, and along with the garlic and sun dried tomatoes add 2 drained tablespoons of capers, tablespoon of Dijon mustard and the rind and juice of one lemon.

You're done! All you had to do was push a button and now your on your way to show off uber fancy-shmancy sounding lunches at school/work due to this extremely handy condiment.

Sunday, August 1, 2010

Easy and Scrumptious Flautas

"Lazy, Lazy Sundaaay. Lazy Lazy Sundaaaaaaaaay!"
Is that not how the U2 song goes? Oh well, but today was an idle day, calling for an idle meal....flautas.

Being that it is summer and our house is full of colourful veggies, my mom and I decided Pico De Gallo was in order as well.
The recipe used today:
  • 2 red and ripe tomatoes
  • 1 tiny green tomato
  • 1 fourth of an onion
  • 1 jalapeno
  • 1 banana pepper
  • desired amount of red pepper flakes
  • salt and pepper
  • 1 splash/ 1 tablespoon of vinegar
Dice up the first 5 ingredients then mix in the latter seasonings. You can also add cucumber or any other variety of pepper you wish, Pico allows for much fun and freedom and you always get: yummmmm....each flavor so distinct and fresh :) *me melting into a pile of joy*

Now the main course:

Flautas:
(makes 4):
Preheat oven to 375 degrees Farentheit

  • 1 15oz can black beans (if you can find no or reduced sodium use that)

  • Salt and pepper

  • 1 teaspoon cumin seed

  • 1/2 teaspoon garlic chili paste

  • 4 tortillas/wraps
Rinse the black beans and put in a bowl, large enough for you to mix in. Add seasonings (more or less to your taste). Squish it all together with you hands (a goopey process but fun). Divide the mixture evenly among the 4 tortillas top with desired amount of cheese, roll tightly and bake for between 15 - 20 minutes.

*you can do the same thing with chicken (just don't mix in garlic chili paste) and shredded pork (again no chili paste but add some cinnamon)*


Serve with salsa, Pico de Gallo, and chutneys :)